_1140.webp "Show details for Guide to Cargo Shock Protection")
Shock indicator labels, also known as impact indicators or impact indicator labels, are used to show when a shipment may have been exposed to excessive shock during handling, storage or transport. Applied to the outside of cartons, crates, export cases and palletised loads, they provide a visible warning that the consignment is being monitored and a clear signal that goods may need inspection if the indicator has activated.
For many shippers, the value of shock indicators is not just in identifying a problem after the event. They can also help deter rough handling by making it clear that the shipment is being monitored. When activated, the indicator can prompt receiving teams to inspect goods before acceptance, installation or onward use.
What are shock indicator labels?
Shock indicator labels are impact-sensitive devices fixed to the outside of a shipment. Each one is calibrated to activate when it experiences an impact above a specified threshold, usually expressed as a g-force rating such as 5g, 10g, 15g, 25g, 37g, 50g, 75g or 100g.
Once triggered, the indicator gives clear visual evidence that the package may have been dropped, struck or mishandled. They are commonly used on shipments where concealed damage is a concern, including medical devices, laboratory equipment, electronics, machinery, control cabinets, export-packed goods and other fragile or high-value consignments.
How shock indicators work
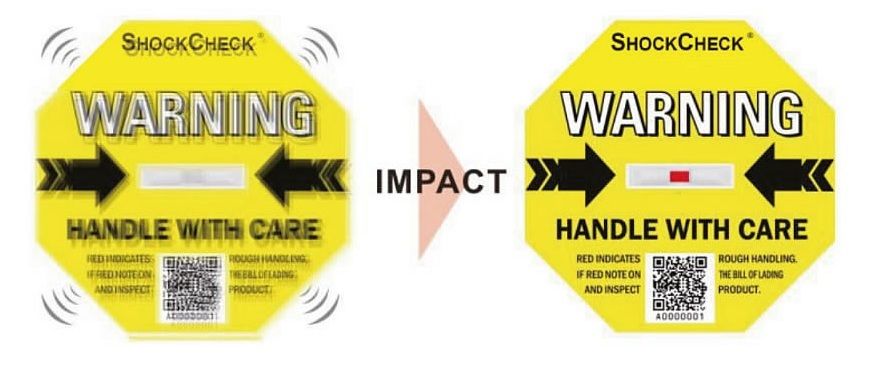
Each shock indicator is designed to activate when the package is subjected to an impact above its specified g-force threshold. Once triggered, it provides a clear visual alert that the shipment may have experienced excessive shock during the supply chain journey.
In practical terms, shock indicators are not intended to record every bump or vibration in transit. They are used to flag impacts severe enough to justify closer inspection, helping receiving teams identify consignments that may need checking before acceptance or onward use.
V1 vs V2 shock indicators
Shock indicators are commonly available in two main formats: V1 always-live indicators and V2 field-armable indicators. Both are designed to show when a shipment may have been exposed to excessive impact, but they differ in how they are handled before application and how they monitor impact.
The main practical difference is armability. V1 shock indicators are live from the outset and therefore need careful handling before use. V2 field-armable shock indicators remain inactive until the backing liner is removed, making them easier to ship, store or distribute before they are applied to the consignment.
Quick comparison: V1 shock indicators are always live and monitor impacts from multiple directions. V2 field-armable shock indicators are activated only when the backing liner is removed and monitor vertical impacts only.
| V1 Shock Indicators Always live | Feature Comparison | V2 Field-Armable Shock Indicators Arm at point of use |
|---|---|---|
| 25G–100G | Sensitivity | 5G–75G |
| Tamperproof | Security | Tamperproof |
| Yes - Barcode or QR code | Serialisation | Yes - QR code |
| Monitors impacts from multiple directions | Impact monitoring direction | Monitors vertical impacts only (top and bottom directions) |
| Approx. 0.099cm2 | Indication window size | Approx. 0.533cm2 |
| 97mm x 97mm | Dimensions | Indicator: approx. 42.5mm x 47.5mm x 5.5mm Warning label: approx. 133mm x 135mm |
| Always live Possible activation at any time, so careful handling is required. | Armability | Field-armable Remains inactive until the backing liner has been removed. |
V1 always-live shock indicator provide 360 degree sensitivity, but as they can be activated before use it is necessary to transport them in bulk in highly protected consignments so they aren't activated prematurely. For this reason they require higher minimum order volumes, additional packaging materials, and sent using reputable courier services. The benefit of the V2 field-armable shock indicators is that there are no such concerns; activation only occurs when the adhesive backing is removed immediately prior to application. This said, V2 field-armable shock indicators monitor vertical impacts only - where impact from multiple directions is a concern, this should be taken into account when selecting the most suitable indicator style.
View our V1 shock indicator labels for cargo or V2 field-armable shock indicators.
What does “g” mean on a shock indicator?
The g rating on a shock indicator refers to acceleration relative to gravity. In simple terms, it indicates the sensitivity level of the indicator. A lower g-force rating means a more sensitive indicator, while a higher g-force rating means a less sensitive indicator.
For example, a 25g indicator is designed to activate at a lower shock level than a 100g indicator. This is important because larger and heavier consignments will often need a lower-g indicator, as damage can occur at a lower level of shock. Smaller or lighter parcels may tolerate sharper impacts and can often be matched with a higher-g option.
How to choose the right shock indicator sensitivity
The correct shock indicator depends on more than just the goods themselves. You should also consider the packed size and weight of the shipment, the fragility of the contents, the protective packaging used, and the likely transport and handling conditions.
As a general rule, heavier or larger packed goods often suit more sensitive indicators such as 10g, 15g, 25g or 37g, while smaller or lighter packed goods may be better suited to 50g, 75g or 100g indicators. If you have packaging test data or known drop tolerances, this can help refine the selection further. Guidance is shown on respective V1 indicator and V2 indicator product pages.
Important sensitivity note
Bigger and heavier consignments do not automatically need a higher g rating. In many cases, larger or heavier packed goods require a more sensitive, lower-g indicator because damaging forces can be transmitted at lower acceleration levels.
Where should shock indicators be placed?
Placement matters because the indicator can only respond to the shock transmitted at the point where it is fixed. Shock indicators should be applied to the outside of the completed shipment on a clean, flat and visible surface.
The best position is not always simply the highest or most obvious point on the pack. For parcels, crates and palletised loads, shock is often transmitted through the base, lower edges and corners, so lower placement on a visible outer face may be more representative of real handling conditions.
- Apply to the outside of the completed shipment.
- Use a clean, flat and visible outer face.
- Avoid soft, uneven or unsupported areas.
- Consider lower edge or corner placement for heavier shipments.
- For critical consignments, consider indicators on adjacent faces.
What are shock indicators used for?
Shock indicators are commonly used to monitor pallets, crates, cartons and other shipments for potentially damaging impacts during transit and storage. They are especially useful where mishandling could lead to product damage, inspection requirements or disputes on receipt.
- Deter rough handling.
- Highlight consignments that may need inspection on arrival.
- Support receiving checks and internal quality procedures.
- Improve accountability across multiple handling points.
- Help identify where packaging or handling practices may need improvement.
Typical applications for cargo shock protection
Shock indicators are used across a wide range of sectors and shipment types, particularly where fragile, sensitive or high-value goods are being transported.
- Palletised shipments.
- Wooden export crates and cases.
- Fragile industrial equipment.
- Electronics and telecoms equipment.
- Laboratory and medical devices.
- Machinery and control cabinets.
- High-value or difficult-to-replace goods.
Are shock indicators single use?
Yes. Once activated, the indicator provides irreversible visual evidence that the shipment may have been subjected to excessive shock. This supports receipt checks, internal investigations and damage claims, and helps discourage replacement after activation.
Do shock indicators replace good packaging?
No. Shock indicators are best used alongside suitable protective packaging, clear handling procedures and, where relevant, other monitoring devices such as tilt indicator labels. They help identify potentially damaging events, but they do not prevent shock on their own.
Shock indicators vs tilt indicators
Shock indicators are intended to show that a consignment may have experienced an excessive impact. Tilt indicator labels are used where the main concern is that goods have been tipped, leaned or inverted beyond an acceptable angle. For some loads, only one of these risks matters. For others, particularly tall, fragile or orientation-sensitive goods, both shock and tilt indicators may be appropriate.
| Monitoring need | Recommended indicator type |
|---|---|
| Goods may be damaged by drops, impacts or rough handling. | Shock indicator |
| Goods must remain upright and should not be tipped or inverted. | Tilt indicator |
| Goods are both fragile and orientation-sensitive. | Shock indicator and tilt indicator |
Final thought
Shock indicators are a simple but effective way to make handling risks visible. They can help deter careless treatment, flag shipments for inspection and support a more accountable transport process, but care is required to specifying the right indicator version, sensitivity level and positioning to suit the needs of your shipments.
Need cargo shock protection for pallets, crates or export shipments?
View our Transport Protection & Monitoring range, including V1 shock indicator labels, V2 field-armable shock indicators and tilt indicator labels for sensitive cargo.